Tuesday, June 14, 2011

Things to Make: Pom-Pom Packaging with Persia Lou


I'm so excited to introduce you to my Guest Blogger this week!  Her name is Alexis from Persia Lou! 


She has a fantastic blog where she features really fun and creative projects and ideas!!  LOVE IT!  She's generously sharing this super fun idea for gift wrap ideas using pretty pom-poms!!   I mean... how seriously cute are these?!?!


Hey there! I'm Alexis from Persia Lou, and I am so excited to be guest posting here at Sarahndipities today! 

Last Christmas, when I began to run low on ribbon, I came up with a fun way to top packages that also uses up some of my yarn stash: pom-poms!


A big pom-pom on top of a gift is fun and a bit unexpected. It adds height and a big shot of color. 

There are many, many different ways to add pom-poms to your packages, but here are a few of my ideas. When attaching one or more pom-poms to a wrapped package, you can simply wrap the yarn around the gift a few times and tie the pom-pom on. Another option is to use a crochet hook to chain a "ribbon" for your gift. (Sarah has some good info on how to make a crochet chain here.)


There are so many great ways to use pom-poms. Don't limit yourself to boxes!


I don't know about you, but I usually keep gift bags I have received and I have TONS stored up. To make a gift bag more unique, you can pull out the original handles and tie it closed with a big pom-pom.


You can also add pom-poms to the end of crochet chain, so the tails of your bow will have little pom-pom punctuation marks.


To add pom-poms to the end of a crochet chain, thread one of the ends of the tails used to tie the pom-pom into a yarn needle. Use the needle to pull the tail through the end of the chain, and then tie the pom-pom to the chain using a double knot.


So. Now you want to make some pom-poms, right? Well, you could buy a pom-pom maker. Or, you could use this technique that only requires yarn, scissors, and your fingers.
  1. Wrap the yarn around four fingers. I find that it helps to start with your fingers a bit spread apart.
  2. Keep wrapping the yarn. The more you wrap the fuller and bigger your pom-pom will be.
  3. Take a piece of yarn about 10-12 inches long. Push one end of the yarn through your middle and ring finger and wrap around the loops of yarn.
  4. Tie a double knot as tight as you can. 
  5. Cut through the loops. Do not cut the longer strings used to tie the pom-pom in step 3. These strings will be used to attach your pom-pom to whatever project you are working on.
  6. Your pom-pom will probably be a bit wild and uneven at this point.
  7. Give your buddy a little trim. The more you trim off, the tighter your pom-pom will be.
  8. Admire your work!
So, how will you use your pom-poms?

PersiaLou


 Enjoy making these, everyone!  Super special thanks-again-so much, to you Alexis!  Be sure to send some blog love her way...she totally deserves it!


Image and video hosting by TinyPic

Tuesday, June 7, 2011

Great Idea: How To Have a Happy Birthday!


Today is my birthday.

I'm blowing off my responsibilities.

Happy Birthday to me!

See you tomorrow!


Image and video hosting by TinyPic

Wednesday, June 1, 2011

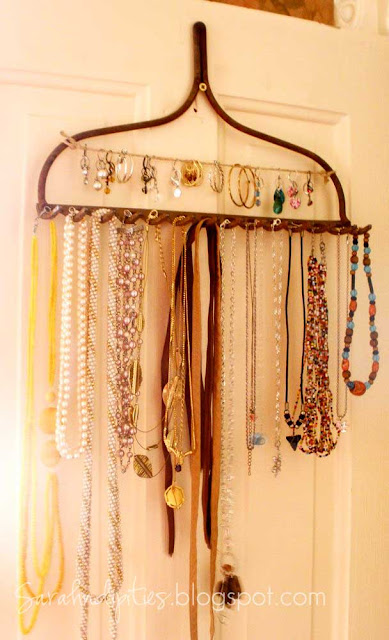
Pinterest Inspiration: Jewelry Display from a Rake

Sorry about not posting this yesterday!  This last couple weeks of pregnancy are putting my brain through the ringer...SO much to do!

I feel like I'm cheating using this as my How-To Tuesday project this week...but I love the way this worked out!!

Not too long ago, on Pinterest,  I saw this cool old rake that had been used as a jewelry hanger!  Genius!

Ever since I made my Burlap Earring Display organizer (which I STILL LOVE...it's soooo perfect!), I've been trying to figure out how to get all of my necklaces...and other earrings...out of a huge tangled mess in my drawer.

This was perfect!

Then, I just happened to remember that we happened to have the head of a cool old rake, hanging up in our shed out back!  You all know how I love a good repurposed/upcycled project...plus this is vintage....Ooooooooh!

Yipee!!

I just cleaned it off a little, tied a length of jute twine around the top part of the rake, so that I could hang my hoop and lobster-claw-style earrings to it, and then mounted the rake head onto the door of my closet!

Ta-Da!!!


It works perfectly!  And no more tangled necklaces!!!! 
(Plus it's out of reach of my youngest, who has a tendency to wander off with my nice jewelry!)

So, if you are lucky enough to have an old rake lying around, give this a try!!  So simple...and it looks fantastic!!!

Image and video hosting by TinyPic

Saturday, May 28, 2011

Things to Make: A Square A Day in May Week 3 ~ Blocks 16-22

Here's update number 2 on my "Square A Day" progress! 

Here are the squares I made for the third week of the Square A Day event, happening at Hooked on Handmade!  All patterns are available for free on Ravelry!

The square for Day 16 is called Falling Star, and the pattern can be found HERE!

I love how this one turned out!  The star pattern in the center is so pretty!

The square for Day 17 is called Framed Flower, and the pattern can be found HERE

This one was kinda fun to make!  It used a couple of different techniques that I wasn't familiar with...but I liked the effect a lot!

The square for Day 18 is called Flowery Square, and the pattern can be found HERE

This one was really fun!  I love the texture of the flower and the other stitches used!  I will definitely be making this one again!

The square for Day 19 is called Grandma's Heart Square, and the pattern can be found HERE

This one was trickier...the pattern was written in UK terms...so it wasn't what I was used to, but I figured it out eventually!!

The square for Day 20 is called Multi-Color Flower, and the pattern can be found HERE

The square for Day 21 is called Violet Crochet Square, and the pattern can be found HERE

The square for Day 22 is called More V's Please, and the pattern can be found HERE

Image and video hosting by TinyPic

Friday, May 27, 2011

What's New: More Matryoshkas!


One of the items I've created for the Scandinavian Festival Craft Fair I'm attending tomorrow, are some more cute little Matryoshka Dolls!

Although these little sweeties aren't exactly Scandinavian per se, they give that same folksy feel that I always get when I go to events like this!

Here are my latest little ladies!

Each one is hand stitched and embroidered from start to finish, with little flower motifs!

Black Babushka with Hot Pink Dress

Baby Blue Babushka
with Denim Blue Dress
Soft Pink Babushka
with Dark Pink Dress

Turquoise Babushka
with Sage Green Dress

Kelly Green Babushka
with Turquoise Dress
I love how each doll has it's own personality...Maybe I should give them each names?  Katerina, Anya, Natasha, Sonya, Anastasia?  What do you think?


I'll definitely be making more of these...they're so fun!  And I'll be getting a listing up in in my shop sometime soon!  I'm also trying to figure how to make these into a pattern so others can make them, too!!


Have a great weekend, Everyone!!

Image and video hosting by TinyPic