Showing posts with label flowers. Show all posts

Tuesday, November 11, 2014

Things to Make: Crochet Poppy Remembrance Pin


In honor of Veteran's Day here in the US, Armistice Day in the UK, and Remembrance Day in France, I put together this simple little crochet poppy pin pattern. 

CLICK THE LINK BELOW TO GO TO THE PATTERN:

Things to Make: Crochet Poppy Remembrance Pin


Wednesday, June 29, 2011

Sneak Peek!


Hope everyone is having a great week so far!  

I've been having a good recovery so far...and our little addition is growing fast!  In my spare time (hahahaha!!! I know.  Funny, right?) I've been working on some projects that I hope to be able to finish before my 10-year-old is in college. 

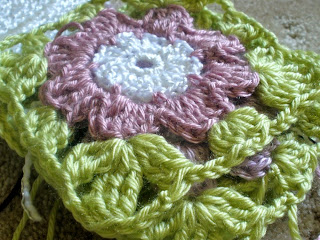
The first project on my list to get done is a crocheted blanket for our new baby!!  I've made a special "blessing blanket" for each of our children, that we've wrapped them in when they had their blessings** in church.  It's a tradition that I've really enjoyed  (I learned to crochet so that I could make a special blanket for my first baby!), and I hope that my children will cherish them and use them for their own children someday!

I thought I'd share a couple of sneak peek pictures with you of the blanket in progress!


I'm almost done now...I just need to get all of the squares put together and finish off the edging!!  I'll be posting pics of the finished blanket next week!!


Image and video hosting by TinyPic

** I am a member of the The Church of Jesus Christ of Latter-Day Saints.  In the LDS church we have a special blessing that is given to new babies to officially name them and to give them special individual blessings.  This is done in conformity to revelation recorded in the Book of Doctrine and Covenants: 

“Every member of the church of Christ having children is to bring them unto the elders before the church, who are to lay their hands upon them in the name of Jesus Christ, and bless them in his name” (D&C 20:70).

We do not believe in baptizing babies - Baptism is reserved for those who are eight years old or older - as we believe that little children and babies who die before baptism are in no need of 'saving ordinances,'  as they are already perfect.  If you'd like more information about this please visit HERE.

Tuesday, May 10, 2011

Things to Make: A Square A Day In May ~ Block 8 ~ Wandith


Here's my next square for the the Square A Day event, happening at Hooked on Handmade!

This square is called Wandith, and the pattern can be found HERE, if you are a Ravelry member!  

I have to admit that this is NOT actually the eighth square for the month!  I cheated and used this square instead of the one that everyone else was doing, because I felt like this one suited my finished piece better.  The ACTUAL square is called On the Huh, and can be found here!


Image and video hosting by TinyPic

Sunday, May 8, 2011

Happy Mother's Day!

Just a little note for all you lovely ladies out there!  Wishing you all a wonderful Mother's Day!

I'm so blessed to be a mother.  There is nothing that can ever truly express the blessings and joy that motherhood brings.

Fresh from the garden...and presented in an empty jam jar...the best kind of Mother's Day Bouquet.
Happy Mother's Day!

Image and video hosting by TinyPic

Tuesday, April 26, 2011

Things to Make: Re-Purposed T-Shirt Yarn!


For today's tutorial we're doing a slightly different take on the usual T-Shirt makeover!  We're gonna turn that shirt into yarn!!!  Yup.

I've seen several different tutorials on this, and found this one to be the most helpful!

Here's my quick how-to:

Materials Needed:
An old -shirt
Sharp scissors

First, lay your shirt out on a flat surface.


Next, cut the bottom hem (if there is one) and the top of the shirt off just beneath the armpits.  It become a big tube.  

Turn the shirt so that on of the folded edges is on top, with the cut edges on each side. 


 Fold the bottom folded edge up...leaving about a 1 inch 'hem' at the top.


Do that again.


Next, cutting from the bottom, cut 1 inch strips upward to the 'hem'...make sure you don't cut through it!!  


When you're done with that unfold the shirt...it should look something like this:


Next, comes the trickiest part.  Slip your arm through the top 'hem' of the shirt.  


Carefully cut across the shirt from the bottom slit to the SECOND slit on the top, at a diagonal.  (Sorry...this part was really hard to take a picture of!)


Continue across the length of the shirt.  At the end, cut across to the open end of the shirt...Repeat on the first side.  (If you don't cut the end you end up with a big circle!)


Now, you have a big long strip of t-shirt.  Obviously, if you use a shirt without side-seams you're going to end up with a much smoother looking strip...but I actually kinda like the raw seams, etc.


After you've made your strip, stretch the shirt apart...it will kinda roll and pull into a narrower string.  Voilá!


T-Shirt Yarn!!!


Now go make something fun and cool, like this funky loopy scarf.  Here's how:

Take a gigantic crochet hook (like a Speed Hook...this thing is seriously, like, as big around as my thumb...maybe bigger) and crochet a long chain with your new yarn.  


Slip stitch into the first ch on hook.  Finish off.  (You can cut off the ends or leave them hanging down for a funky look.)  

Wear your new creation by twisting it around your neck.  


Add a cute T-Shirt Flower clip or pin to add a little extra flair!  (I made this flower following the basic plan of these flowers, and added a button to the center and some felt leaves as an accent...then I hot-glued it to a hair clip.  Simple!)


Hope you all have fun with this fun new way to use an old shirt!!


Happy Creating!

Image and video hosting by TinyPic

Tuesday, March 22, 2011

Things to Make: Free Crocheted Flower Garland Pattern


I've had so much fun with my crocheted heart garland and crocheted shamrock garland, that I thought I'd make another garland for Spring!!

This cute little flower can be used on other fun projects, too, of course!!  (Don't be scared away by the pattern...it's really much simpler than it might seem at first glance!!)


Here's the pattern:

Materials Needed:
size I crochet hook
scrap yarn in desired colors

Abbreviations:
ch  = chain
hdc =  half-double crochet
dc = double crochet
st = stitch
sl st = slip stitch
sp = space
rem = remaining
rep = repeat
beg = beginning


FLOWER

Ch 4, join with sl st to form a ring.

ROW 1
Ch 1, work 9 sc in ring, join with sl st to beg ch 1.

ROW 2
Ch 3, work 2 dc inst at bottom of ch, sl st in next ch, *work 3 dc in next ch, sl st in next ch *, rep from *to * 3 more times.  5 petals made.

You can stop there if you want teeny tiny flowers, or you can continue with another round to make the petals fuller, as follows:

ROW 3
Sc in next st, hdc in same sp, work 3 dc in next st, hdc in next st, sc in same st, sl st in sl st from previous row, * sc in next st, hdc in same sp, work 3 dc in next st, hdc in next st, sc in same st, sl st in sl st from previous row *, rep from * to * 3 more times.  Fasten off.  Weave in ends.


GARLAND

Ch 25, * sl st in top of one petal of flower, ch 15 *, rep from * to *until all flowers are joined, ch 25, Fasten off.


For my garland I've used Caron Simply Soft yarn in various pastel colors...I love how soft and simple it looks!  But it has such a pretty sheen to it!  (Maybe I'll keep this one to hang over the crib once baby #5 arrives in June!)

If you like the way this looks, but just don't want to make one for yourself, you can purchase this cute garland in my shop, here!


Happy Spring, Everyone!!!


Image and video hosting by TinyPic

Tuesday, March 15, 2011

Things to Make: Tissue Paper Cherry Blossoms


THIS POST HAS BEEN MOVED!
YOU CAN NOW FIND THIS TUTORIAL OVER MY WEBSITE, SARAHNDIPITIES.COM!
CLICK THE LINK BELOW TO GO THE TUTORIAL:


Monday, January 31, 2011

Things to Make: Tissue Paper Flowers


I'm sure that many of you already know the basics of making tissue paper flowers, but I thought I'd share a quick tutorial on how to make some cute, quick flowers! I love crafts like this because I can use something that is waaaaaay past its prime (ie crumpled re-gifted tissue paper from who knows when) to make something cute and gift-worthy! These are really simple and kids can help make them, too!

Materials needed:
tissue paper, in any colors you'd like!
pipe cleaners
buttons
hot glue gun (mom tool!)
scissors


We started out with big sheets of tissue paper, that I cut into squares to make them more manageable for the kids. I cut them into squares about 4 to 5 inches big...As you can see I was not so precise in them being exact squares.


Next layer four or five squares on top of each other and folded them into quarters. Then cut petal shapes out of the folded quarters of paper...I cut mine in a sort of heart shape for Valentine's day. **REMEMBER TO LEAVE THE CENTER FOLD UNCUT!!!** (We had a couple of mishaps with this step...if you cut the center of the paper you end up with a bunch of unattached petals!)


After all the cutting is done unfold the petals and separate them from one another. Then you can layer them back together, overlapping and filling in gaps.


Gently push a pipe cleaner through the center of the flower, put a button on it, and bend it over, and through the other button hole to make a little center for your flower. (You may have to help with poking the holes in the flowers.)


The next few steps are ones that Moms should probably help with! Put a little dab of hot glue under the button, and gently pulled the button down onto the tissue. (This step is optional, but makes your flower a little sturdier. If you're doing this project with younger kids, you can skip the next few steps altogether and go straight to the finishing step!)


To cut leaves, I just folded up some green tissue paper and cut a leaf shape out. After fastening the top of the flower together, I glued a couple of leaves to the bottom of the flower, and pinched them to give some dimension.


Then I used a strip of green tissue, and wrapped it around the rest of the stem, gluing as I went and adding a couple more leaves. (Again, this is totally optional, but makes the flower look a little more finished...especially if you are using white pipe cleaner, instead of green, like I did!)


To finish the flower gently scrunch the layers of petals upward, to add some texture, and then 'fluff' them up.


Ta-da!! A simple and sweet tissue paper flower! (I know. It's not Martha Stewart. But hey...it's a pretty good knock-off, eh?)


You can create all sorts of petal shapes, and edges to your flowers! Use pinking shears or other shaped scissors to get some really fun effects! You can also layer different colors together to make some truly unique flowers!

A bouquet of these adorable tissue paper flowers would make really sweet gifts for teachers, grandmas, and other special ladies in your kids' lives!

This song, called "Candy Hearts and Paper Flowers," has been going through my head for the past few days. It's from a movie, that is no longer in print, called "Raggedy Ann & Andy: A Musical Adventure." There are some kind of crazy animation sequences in it, but the music was really fun, and I still remember it. This song is still one of my favorites! (I'm sure there is probably a video for this out there somewhere...but the quality of this recording was really good, so this is the one I went with!) Enjoy!


Have fun and Happy Monday!


Image and video hosting by TinyPic