Friday, March 25, 2011

Feature Friday: Happy Colors!


So.

Right now, as I'm typing this, there is snow falling outside my house.  Snow.

Argh.

I'm trying not to be a complainer.  Here where we live water gets scarce during the summer months, and we need the water runoff produced by the snow to help sustain our reserves during that time.  I'm trying to think of this as Mother Nature's way of helping us keep our garden watered later this year.

But seriously.  I'm soooo over Winter, right now!

Anyway, to help cheer myself up I'm featuring some fun finds, with a punch of sunshiney goodness!

Flowers and Little Bee Print by TwoEms


Fabric Leaves Tree by Two Girls Being Crafty


Egg Carton Spring Wreath by Krafty Kat


Nuthatch Granny Pattern by eggbird designs


Burlap and Fabric Spring Wreath by Nat Sprat


From the Prairie Notecards by The Wheatfield


Crochet Easter Egg Pattern by Easy Makes Me Happy


(If I've featured you feel free to grab a featured button from My Buttons page at the top!)

Have a Happy Weekend!!!

Image and video hosting by TinyPic

Wednesday, March 23, 2011

Great Idea: Build a Better Blog #4 - Extra, Extra!!


This is my final week of Build a Better Blog!  I've had a lot of fun putting these ideas together...and I hope the tips I've offered have been helpful!!


This week I'm focusing on the extra stuff you can put on your blog:  button, badges, banners, and other fun extras!

First off, I just want to tell you right now that I am NOT an expert...but I know where to find them!!  I've borrowed the following link to some of my favorite resources for all things technical!  So I'm cheating on this one and just giving you all some of the tools I've discovered for doing things yourself!!  (A huge thanks goes out to all those who have written these fantastic tutorials!!!)

BLOG BUTTONS

Here are some tutorials on how to make your blog button and badges...and how to get the code to share them with others!!

Blogging With Amy has THIS fantastic walkthrough on making blog buttons, and getting the code onto your blog!

Musings of a Housewife has THIS one, with some suggestions on how to make it readable and fun!

Welcome to Linneyville has THIS tutorial for Picnik.com on how to make your button *cute*!

BLOG BANNERS

Here are some links to tutorials that are all about making your blog banner fun and cute:

Blissfully Domestic has THIS one on using Picasa to make a fantastic photo banner!

Songbird Nesting has some great tips in THIS one about the feel and overall look of your blog banner...and how to install it in Blogger!

And All About Us has the nitty gritty how-to with Picnik.com on THIS one!

BLOG FONTS & TITLES

Kevin and Amanda have THIS great tutorial on how to add a cute font to your blog post and sidebar titles!

Makin' Cute Blogs has THIS one on adding images to sidebar titles!

EVERYTHING ELSE!!!

The Blog Guidebook has TONS of great tutorials and resources available for bloggers who are looking to spice up their blogs!  Seriously...if I haven't linked to anything you've found helpful yet...check THIS one out for sure!!

Soooooo....I hope you find some great info and tips here!!  Thanks for joining me for my Build a Better Blog series!!  I hope you all have a great time beautifying you blogs!!!


Image and video hosting by TinyPic

Tuesday, March 22, 2011

Things to Make: Free Crocheted Flower Garland Pattern


I've had so much fun with my crocheted heart garland and crocheted shamrock garland, that I thought I'd make another garland for Spring!!

This cute little flower can be used on other fun projects, too, of course!!  (Don't be scared away by the pattern...it's really much simpler than it might seem at first glance!!)


Here's the pattern:

Materials Needed:
size I crochet hook
scrap yarn in desired colors

Abbreviations:
ch  = chain
hdc =  half-double crochet
dc = double crochet
st = stitch
sl st = slip stitch
sp = space
rem = remaining
rep = repeat
beg = beginning


FLOWER

Ch 4, join with sl st to form a ring.

ROW 1
Ch 1, work 9 sc in ring, join with sl st to beg ch 1.

ROW 2
Ch 3, work 2 dc inst at bottom of ch, sl st in next ch, *work 3 dc in next ch, sl st in next ch *, rep from *to * 3 more times.  5 petals made.

You can stop there if you want teeny tiny flowers, or you can continue with another round to make the petals fuller, as follows:

ROW 3
Sc in next st, hdc in same sp, work 3 dc in next st, hdc in next st, sc in same st, sl st in sl st from previous row, * sc in next st, hdc in same sp, work 3 dc in next st, hdc in next st, sc in same st, sl st in sl st from previous row *, rep from * to * 3 more times.  Fasten off.  Weave in ends.


GARLAND

Ch 25, * sl st in top of one petal of flower, ch 15 *, rep from * to *until all flowers are joined, ch 25, Fasten off.


For my garland I've used Caron Simply Soft yarn in various pastel colors...I love how soft and simple it looks!  But it has such a pretty sheen to it!  (Maybe I'll keep this one to hang over the crib once baby #5 arrives in June!)

If you like the way this looks, but just don't want to make one for yourself, you can purchase this cute garland in my shop, here!


Happy Spring, Everyone!!!


Image and video hosting by TinyPic

Wednesday, March 16, 2011

Great Idea: Build a Better Blog #3 - Get Noticed!!!


So you've started to make the design of your blog reflect you and you are working on improving the quality of your photos...so now what do you do?

This post is all about how to promote your blog!

There are so many wonderful resources available for bloggers out there!

1. Build your content!  A pretty blog won't get you noticed unless you have something to say!  Once you have your blog set up, you need to start adding CONTENT.

Content can be anything from a picture with a caption to a tutorial to a recipe to something you've made for your shop!  Be yourself!  Write about what you like - what interests you!  The more content you have on your blog, the more traffic you will get.

2.  Join a Link Party!  A link party is simply a list of links that the author of a blog 'hosts' for a certain period of time.  They can be general or very specifically themed.  (I personally contribute to several link parties each week!)  They are free to join, and are a lot of fun!

There are several types of link parties out there - some of the most popular are: crafts, recipes, home decor, photos, and blog hops!

A blog hop is a special type of link party that gives other bloggers the chance to visit and follow your blog -  as you visit and follow other blogs, too!  It's a great way to 'meet' fellow bloggers and make Blog Land 'friends!'

Here's a really great link to a fun blog that keeps a running list of weekly link parties going on:


The Girl Creative


3. Leave and respond to comments! In addition to linking up your content at a link party, you also need to visit other links and leave comments! Not only is it just good etiquette...but it's also good karma! People LOVE to get comments...so if you leave a positive comment on someone else's blog post, they are more likely to return the love, and leave a comment on your blog, too!


4. Link to other blogs! If you see something that you love out in Blog Land, share it on your own blog! Make sure you link back to the original author's post and pictures, and be sure to let them know! It's always flattering to know that someone liked something you did! 


5. Be consistent! Try to aim for at least two to three posts on your blog each week. If you are inconsistent with the amount of posting you do on your blog (ie going for long periods of not posting anything), people will be less likely to continue to follow your blog. Make a simple goal to start with, so that you don't get burned out. Be flexible about it, too! 


6. Advertise! If you have a little extra revenue, advertising is a great way to get your blog or shop noticed. Several of the 'Big-Time' blogs offer advertising spots on their blogs. You can also so some self-promotion by offering a giveaway to follower or hosting a contest of some kind. (I'll be posting next week about how create your own blog buttons for people to post -- you can usually use these button for advertising, too!) 


For more fantastic resources about blogging tips, visit these links to the Pro's:


A girl and a glue gun


Good luck, gang!  Happy Blogging!!


Image and video hosting by TinyPic

Tuesday, March 15, 2011

Things to Make: Tissue Paper Cherry Blossoms


THIS POST HAS BEEN MOVED!
YOU CAN NOW FIND THIS TUTORIAL OVER MY WEBSITE, SARAHNDIPITIES.COM!
CLICK THE LINK BELOW TO GO THE TUTORIAL:


Wednesday, March 9, 2011

Great Idea: Build a Better Blog #2 - A Picture is Worth a Thousand Words!


You've all heard the saying...and know what I'm talking about, right?

But here's what you may not know: you don't have to be a professional photographer to take good pictures! In this day of digital cameras, taking good pictures is easier than ever...but you can also fall into mediocre photo-taking traps just as easily.

Today I'm going to share some simple tips for getting (and taking) better pictures! Taking good pictures is more than having a great camera or awesome products!

1. KNOW YOUR CAMERA! Because of the ease of digital cameras, you can often overlook features that can help you take better pictures. It may seem like a really boring and unimportant thing to do, but read your camera's manuel! Get to know the features your camera offers. Do have the option to use a Macro lens? Figure it out! Do have the ability to adjust the f-stop on your exposure? Do it! (Don't know what these things mean? Your manuel will probably explain them!)

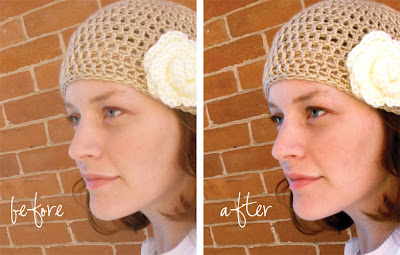
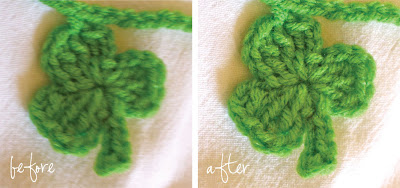
2. USE GOOD LIGHTING! It's easy to just use your camera's Auto-Flash when taking pictures, but there is nothing less professional looking than product pictures taken with a flash. Even if you are taking pictures of something in your own kitchen, using a flash makes it look unprofessional. You can use the same setting with good light and get fantastic pictures!

Try to take your pictures during the day in a place that is lit by lots of bright indirect light! If this isn't quite possible take advantage of some good photo imaging software to "fix and brighten" your pictures. Most cameras have some sort of simple photo imaging software included for your computer, so when you upload pictures from your camera you can adjust certain things.


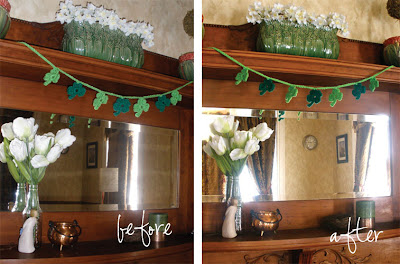
Play with exposure, saturation, and shadows.


If your imaging software isn't quite up to snuff, you can also use another program like Photoshop or Picnik (which is FREE!)! Go mess around with your options!

3. GET FOCUSED! No amount of good light can make up for the lack of focus in a picture. Make sure you're subject is in focus. This being said don't be afraid to get up close and personal...if your camera has the option of a Macro lens setting, you can take some really fun and interesting shots by focusing in on just a part of your subject, rather than the whole.


4. TRY SOMETHING NEW! This one is pretty simple...Experiment with different backgrounds, lighting effects, and compositions. You don't always have to take a picture from a straight-forward angle:

Change things up by putting your subject off-center!


Crop to feature a specific part of a picture!


Tilt your camera to get a different angle!


5. TAKE LOTS OF PICTURES! It's easier to eliminate the bad pictures if you have a bunch to choose from! Try to take multiple shots of each angle...this will help allow for lighting discrepancies, angles, and compositions. You can get rid of the ones you don't like with the click of the button...that is the beauty of digital!!

6. DON'T STRESS! Taking photos can be an overwhelming process...don't let it stress you out! Take it one step at a time! Read a little about your camera, and then take a break! Try something new during one photo shoot, and see if you like the result. Take it easy and have fun!!

Hope these little tips will help you start thinking about how you can improve your photos, and get you thinking about trying new things!!

Have fun!!!


Image and video hosting by TinyPic

P.S. I'm also sharing this post on the SAHM of Etsy Team blog and one the Olive Smiles fanpage!

Tuesday, March 8, 2011

Things to Make: Paper Punch Leprechaun


This cute little guy is the perfect way to embellish St. Patty’s Day decor! Use him on napkin rings, gifts for friends, cards, tags, and more! He looks so cute peeking out of a little pot of 'gold!' (You can use Werther's, Hershey's Treasures or Kisses, or foil-wrapped chocolate coins!)

Materials Needed:
Scraps of colored card stock (light flesh color, pink, orange, black , yellow)
Scissors
Adhesive (glue stick, etc.)
Pink chalk or blush and a Q-tip
1 3/4" Scallop Circle Punch
1 3/8" Circle Punch3/4" Circle PunchTag Punch
(I'm using Stampin' Up! Punches...they've recently been redesigned - the new look is awesome! The ones I'm using are the old design.)


First punch out the shapes you need: a flesh colored 1 3/8" circle, a pink 3/4" circle, an orange 1 3/4" scalloped circle, a black tag, and cut out a small rectangle strip out of black and a yellow square.


I'm layering my little leprechaun on a green tag/card so you can see him better, but you can make him as is! Start with the orange scalloped circle first.


Adhere the flesh colored circle next.


Add the pink circle onto that.


Next, adhere the black tag.


Then the black rectangle strip.


And finally the yellow square.


Draw on eyes and a mouth.


And give him some cheeks with a little pink chalk or blush.


I've also written a little note below him!


You can make him on a tag, like I've done, or attach him to a toothpick or craft stick to put into a candy dish or cupcakes!

Image and video hosting by TinyPic