Friday, April 29, 2011

Feature Friday: A Square A Day in May


Good morning everyone!!

This week I'm featuring a fun crochet event that I'm participating in this next month!  It's called a Crochet A-Long!  Basically everyone who is joining will be working on the same project for the entire month, and sharing their progress everyday!!


The event's theme is "A Square A Day in May!"  It's being hosted by Melissa from Hooked on Handmade!  If you haven't visited her blog...go check it out!  She does so many fun things!!  

Here are some of the squares we'll be making during the event:


Kata by Penny Davidson

Starfire by Melinda Miller
Flowery Square by Adaiha Covington


Aren't they gorgeous?!?!

We'll be making 30 12" granny squares and putting them all together!  I'm so excited!  (In fact...I've already jumped ahead and started my squares...seeing as May is gonna be a BUSY month for me!)  I'll posting pictures of my squares each day, in addition to my regular posts!

Even if you are new to crochet, this is a great opportunity to learn some new stitches and techniques, and to connect with other fabulous crocheters from all over!!

Go check it out!!


Image and video hosting by TinyPic

Wednesday, April 27, 2011

What's New: Wave Afghan and Tiny Whale Rattle


Hope everyone is having a great Wednesday today!

I thought I'd share some pics of a couple of the projects I've been working on this past little bit! 

First off -  my cousin, Amy (she and one of my sisters share a really fun Etsy Shop, called Frills and Bils, where they sell hand made gift bows, and origami creations!!  Really cool!  Go check it out!), is having her first baby in June!!!  It's a boy!

We threw her a little baby shower a couple of weeks ago, with a nautical theme!  She's always loved everhthing oceanic...and she got so many cute little, sea creature outfits, bath things and toys!  So cute!

Anyway, this is what I made her for her new little bundle! An Ocean Wave afghan and a little amigurumi whale rattle!  I LOVE the way they turned out!


The blanket was made using some fantastic yarn I had picked up on clearance (it didn't even have a label on it to say what the yarn was called!!)...it's so super soft and cuddly...combined with some lovely brushed white yarn!


The little whale was made holding two strands of Simply Soft yarn together, following THIS basic pattern, by Planet June!  He has a couple of little bells sewn inside, so that he rattles when he is shaken!


I LOVE the way these came together!

Image and video hosting by TinyPic

Tuesday, April 26, 2011

Things to Make: Re-Purposed T-Shirt Yarn!


For today's tutorial we're doing a slightly different take on the usual T-Shirt makeover!  We're gonna turn that shirt into yarn!!!  Yup.

I've seen several different tutorials on this, and found this one to be the most helpful!

Here's my quick how-to:

Materials Needed:
An old -shirt
Sharp scissors

First, lay your shirt out on a flat surface.


Next, cut the bottom hem (if there is one) and the top of the shirt off just beneath the armpits.  It become a big tube.  

Turn the shirt so that on of the folded edges is on top, with the cut edges on each side. 


 Fold the bottom folded edge up...leaving about a 1 inch 'hem' at the top.


Do that again.


Next, cutting from the bottom, cut 1 inch strips upward to the 'hem'...make sure you don't cut through it!!  


When you're done with that unfold the shirt...it should look something like this:


Next, comes the trickiest part.  Slip your arm through the top 'hem' of the shirt.  


Carefully cut across the shirt from the bottom slit to the SECOND slit on the top, at a diagonal.  (Sorry...this part was really hard to take a picture of!)


Continue across the length of the shirt.  At the end, cut across to the open end of the shirt...Repeat on the first side.  (If you don't cut the end you end up with a big circle!)


Now, you have a big long strip of t-shirt.  Obviously, if you use a shirt without side-seams you're going to end up with a much smoother looking strip...but I actually kinda like the raw seams, etc.


After you've made your strip, stretch the shirt apart...it will kinda roll and pull into a narrower string.  Voilá!


T-Shirt Yarn!!!


Now go make something fun and cool, like this funky loopy scarf.  Here's how:

Take a gigantic crochet hook (like a Speed Hook...this thing is seriously, like, as big around as my thumb...maybe bigger) and crochet a long chain with your new yarn.  


Slip stitch into the first ch on hook.  Finish off.  (You can cut off the ends or leave them hanging down for a funky look.)  

Wear your new creation by twisting it around your neck.  


Add a cute T-Shirt Flower clip or pin to add a little extra flair!  (I made this flower following the basic plan of these flowers, and added a button to the center and some felt leaves as an accent...then I hot-glued it to a hair clip.  Simple!)


Hope you all have fun with this fun new way to use an old shirt!!


Happy Creating!

Image and video hosting by TinyPic

Sunday, April 24, 2011

Happy Easter!!!


He Lives!


Image and video hosting by TinyPic

Tuesday, April 19, 2011

Things to Make: Fingerprint Bunnies and Chicks!!!!


This tutorial can now be found on my website: Sarahndipities.com!


I know you'll love this fun craft!


Image and video hosting by TinyPic

Wednesday, April 13, 2011

A little Ramble...


So...

What's new this week?  

Me?

I didn't get to my Things to Make post yesterday.  I felt so guilty.

Especially since when I woke up this morning I found that I have 295 followers now!!!

Holy Cow!  You guys ROCK!!!

But, I suddenly felt like if I wasn't posting my regularly scheduled tutorial/pattern/idea/whatever I'd be letting all of you wonderful people down!

Then I sat back and really thought about this whole blogging thing.  I LOVE being able to share what I like doing with so many wonderful people...and the fact that I've been able to be so consistent with it for the past few months!  

But this past week has been CRAZY!!!  And I had to remind myself that first and foremost I'm a Mom.  I'm also a wife, cook, housekeeper, nurse, business owner, and an incubator for baby #5.  And all those things take up a lot of time and energy.

I needed to help with school projects, and injuries, and meals, and laundry, and life.  And sometimes that just the way it is.  And I wouldn't want my life to be any different!  I love being a mom and wife...and all that comes with the territory!!!  There's true satisfaction and joy in being able to be who I am!!!  I feel truly blessed to be able to do what I love everyday!!


So, I hope you'll all forgive me for slacking off this week on my tutorial...and hope you'll hang with me as I adjust my schedule to fit my growing family's needs.

And I promise that I've been busy creating things, too!  (I just haven't had extra time to take pictures and write up instructions!!)  And I'll be sharing stuff with all of you lovely people soon!  

Thanks for allowing me to be all the things I am here!  I SO love the interactions I get to have all of you amazing people everyday!

I'd love to hear what's new with you this week!

Image and video hosting by TinyPic

Wednesday, April 6, 2011

Feature Friday: Getting to Know...Me!


This week I'm the featured seller on the SAHM of Etsy Team blog!  I loved the questions they asked...and thought I'd share with all of you a little more about me!!  (You can see the original post by clicking HERE!)

What is your name?
Sarah

Where are you located?
Mount Pleasant, Utah

What type of merchandise will shoppers find in your shop?
Crocheted hats, scarves, and accessories - like flower clips and brooches, as well as some hand- sewn/embroidered items. I also have another shop where I sell some supplies and hand-stamped cards!

The Flip Flapper

How/why did you get started?
I looked around at what was out there and finally said, "The only thing keeping me from turning my hobbies into a business is me!"

How long have you been crafting?
My whole life! I can remember making things when I was only three or four! Once when I was at the house of one of my mom's friends, I asked her if she had any corrugated cardboard, so I could make a craft. She was surprised I even knew what that was!! I was only four!

The Newsie

How did you get started in crochet? Who taught you? 
My grandmother taught me to crochet when I was expecting my first baby ... I really wanted to make a pretty afghan for my baby girl. Grandma taught me how to make a granny square ... the rest, as they say, is history!

What is your favorite thing to make? 
This is a toughie! I love to make hats and flowers!! They're so much fun! And I really love trying out new patterns ... the challenge of trying something different is always fun to me!

What inspires you to create? 
My kids! I also love colors and textures ... I get lost in the paper, bead, and yarn sections of craft stores ... the colors kind of just send me into a trance! LOL

Button Blossom
What is one thing you need to have with you while you craft?
Scissors!! It doesn't matter what type of craft I'm doing -- crochet, cards, sewing, etc. -- scissors are vital!!! I also have to have paper and a pencil to write ideas down on ... otherwise my brain can't keep focused on one project at a time!!

How do you balance mothering and running a small business? 
I've given myself a schedule. At certain times of the day, I have to be Mom. I try to get most of my computer work done before the kids are up or after they are in bed. I work on crocheting projects while they are playing and sometimes other stuff during nap time!

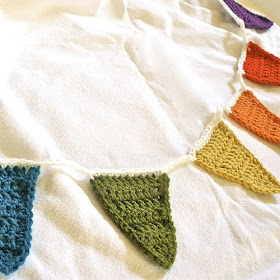
Crocheted Pennant Garland or Banner

What is your favorite thing to browse Etsy for? 
Sheesh. I love looking at artwork, textiles, natural products. There's so much amazing stuff here!! It's really hard to narrow it down!!

When you're not crafting, what are you doing? 
Being a mom, of course!! (You know: laundry, dishes, housework, homework, meal-making, fixing things, etc!) I also like to read, sing, and watch movies with my hubby!

The Plain Jane

Where can we find you?
My Etsy shop is http://sarahndipities.etsy.com
My supply/card shop is: http://stampsndipities.etsy.com
My blog is: http://sarahndipities.blogspot.com
My Facebook page is: http://www.facebook.com/sarahndipities1

What is your favorite shop (not yours) on Etsy currently? 
Wow! I really love Emma Lamb. Her stuff is so pretty and colorful! I also really like TwoEms ... awesome bold art prints!

Image and video hosting by TinyPic

Tuesday, April 5, 2011

Things to Make: Glove Bunny Tutorial


Happy Tuesday!!


For today's tutorial I thought I'd share this super cute and simple idea for making soft little Easter bunnies out of a glove!!!

That's right!  This cute little fellow was created using a knit glove!  I got these super-marked down at the dollar store...I think they were twenty-five cents, or something!  Are you convinced you need to make a basketful of these, yet?

Materials Needed:
1 knit glove, in color of choice  ( I used this soft minky-type glove)
matching thread
needle
pink embroidery floss
2 buttons for eyes
batting or stuffing
scissors


The first step  is to turn the glove inside out:


Next, carefully cut off the thumb, pinky, and middle fingers of the glove...save the scraps for later!


The next part can be done on a sewing machine, but I like to hand sew these little guys!  It's fun, and it's a great way to teach kids how to sew things by hand!  (If I were making these with kids I wouldn't use the fluffy kind of glove, though...it's a little harder to see where you've stitched!)  LEAVE THE BOTTOM OPEN!


After you sew the thumb, pinky, and middle finger openings shut, turn the glove right-side out.  (This is the best way to check and make sure you didn't miss any seams!!


The next step is the trickiest:  Sewing on the face!  Using the embroidery floss sew on the button eyes, and stitch a little nose.  Be careful that you are only sewing through the front part of the glove!


Cut off about an inch of the tip of one of the leftover fingers, and stuff it with a little fluff!


After the face has been stitched on, you can start stuffing!!  Stuff the ears, head, and body...I use the leftover scraps from the fingers to stuff the very bottom of the bunny.

After the bunny is stuffed to your liking, stitch the bottom opening edge closed.  I used a blanket stitch.

The last part is adding the tail!  Turn the cut edge of the save finger piece under, and whip stitch it to the bottom/back side of the bunny.  The little tail will help to prop your bunny upright!


And there you have it!!


I also added a pink ribbon around this little guy's neck, but that is totally optional!!


These would make super cute additions to any Easter basket, or as a quick little add-on to a baby gift!


Have fun creating a little bunny farm of your own!!

Image and video hosting by TinyPic